Help & Tutorial
Jump with the sidebar, or search across titles, tags, and content.
Create an Account
Follow these steps to create a new WorkFlow+ account and verify your email.
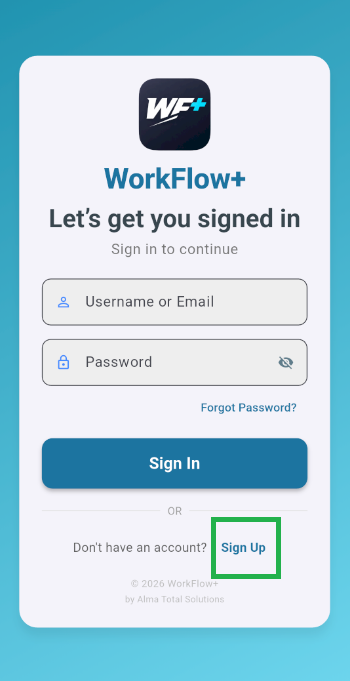
Step 1 — Open Sign Up
On the login screen, tap Sign Up (highlighted below).
Step 2 — Fill in your details
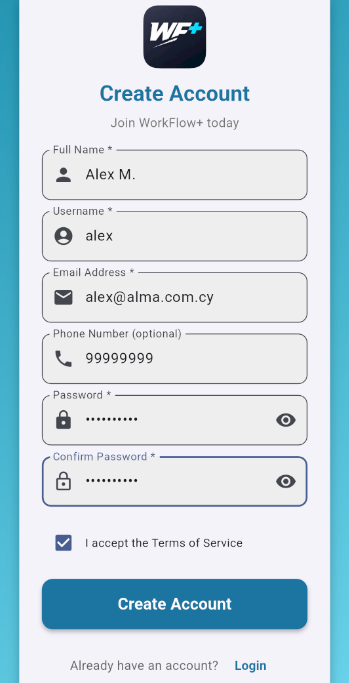
Complete the form with your information:
- Full Name (required)
- Username (required)
- Email Address (required) — make sure it’s valid (you’ll verify it next)
- Phone Number (optional)
- Password + Confirm Password (required)
- Tick I accept the Terms of Service
Step 3 — Verify your email
After creating your account, you’ll be asked to verify your email address.
- Check your inbox for a message containing a 6-digit code
- Enter the code in the verification screen
- Tap Verify Email
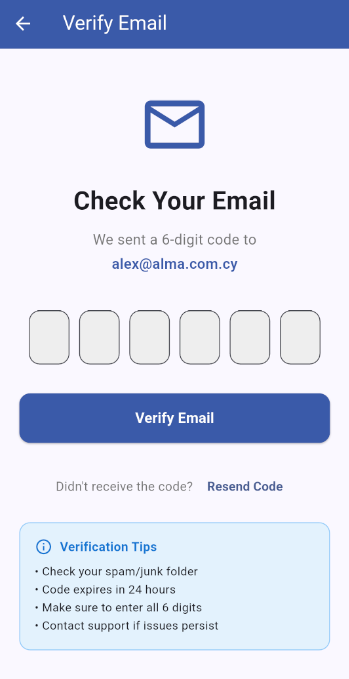
- Check your spam/junk folder
- The code may take a minute to arrive
- Make sure you entered all 6 digits
- If needed, use Resend Code
Upgrade to Pro
WorkFlow+ Pro unlocks advanced tools for managing users, groups, projects, and reports. Follow this guide to upgrade and see what changes immediately after activation.
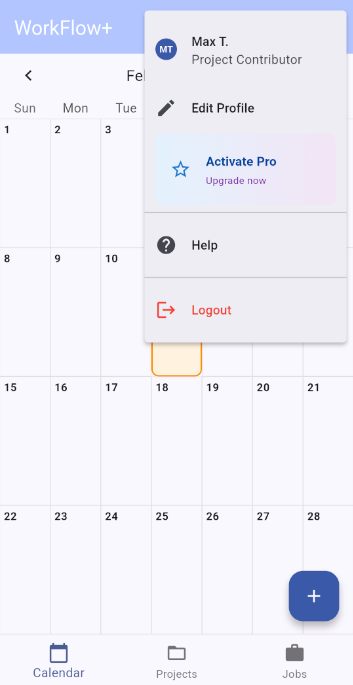
1. Open the menu (Free version)
Tap the top-right menu. If you are using the Free version, you will see the Upgrade to Pro option.
2. Open the Upgrade to Pro screen
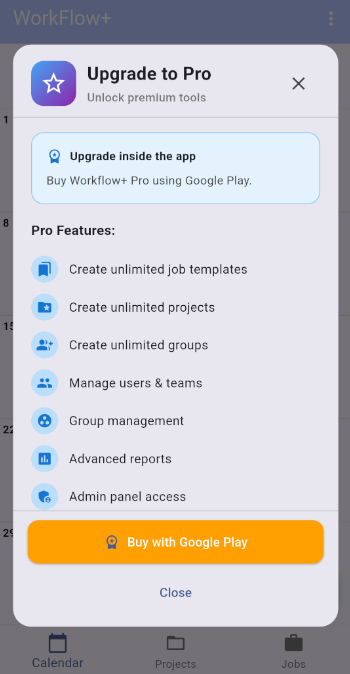
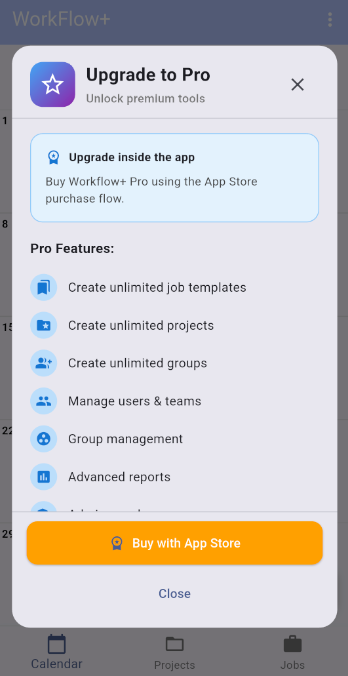
Tap Upgrade to Pro to open the Pro upgrade window.
On Android:
On iPhone:
3. Buy Pro inside the app
- Review the Pro features shown on the screen
- Tap Buy with Google Play on Android or Buy with App Store on iPhone
- Complete the purchase using your store account
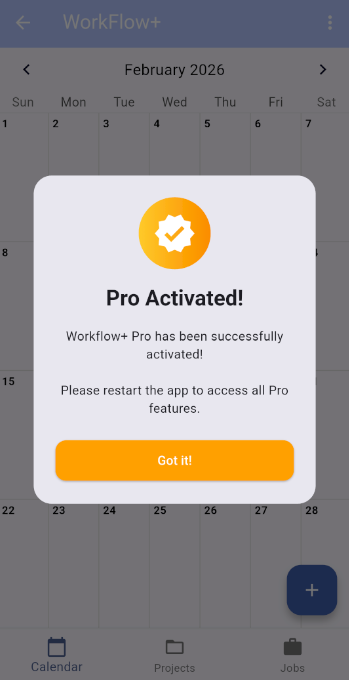
4. Pro activated
Once the purchase is completed and confirmed, you will see the confirmation screen.
5. Menu after activation (Pro)
After activation, open the menu again. You will now see additional features and tools available only in Pro.
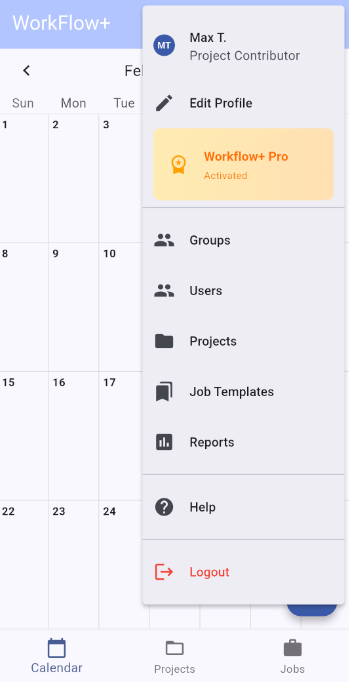
What changes with Pro
- Unlimited Job Templates
- Unlimited Projects
- Unlimited Groups
- User & team management
- Advanced reporting
- Admin-level controls
Troubleshooting
- Make sure the purchase completed successfully in Google Play or the App Store
- Wait a few moments for your Pro access to sync
- If you already had Pro before, use the restore option if it is available on your device
- Sign out and sign back in if your account access needs to refresh
- Check the menu again for Pro features
Edit Profile
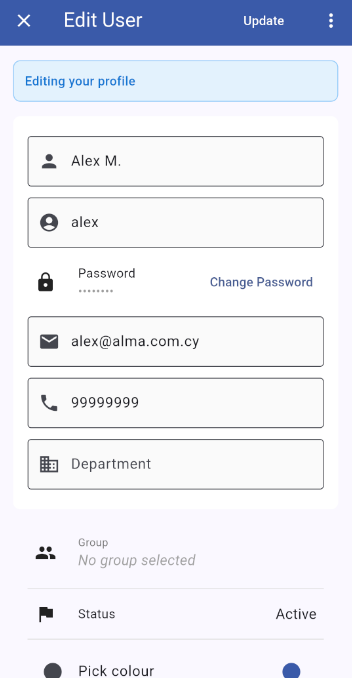
Use Edit User to update your account details (name, username, email, phone, department) and save changes.
Step 1 — Open your profile editor
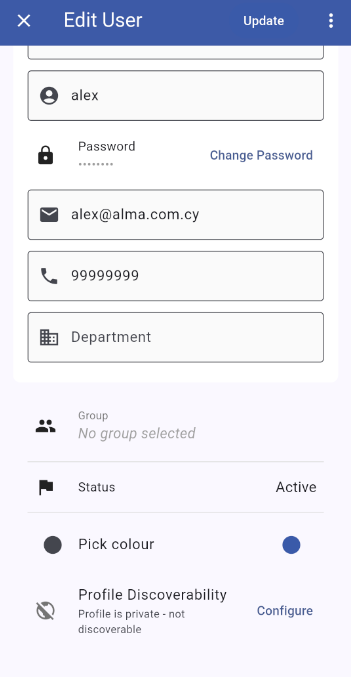
In the Edit User screen, you can scroll up/down to view and modify your details.
Step 2 — Update fields
- Update any fields you need (for example: email, phone, department).
- If you want to change your password, use Change Password (if available).
Step 3 — Save changes
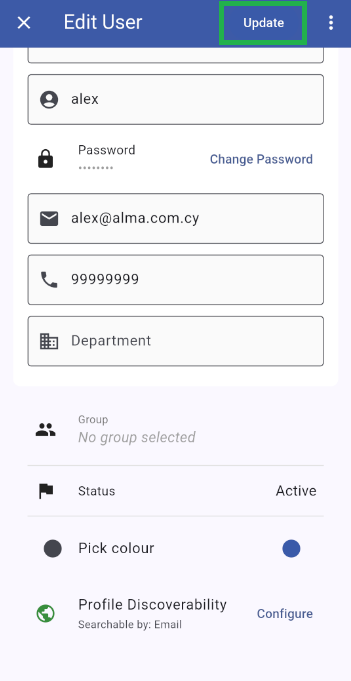
When you finish editing, tap Update to save your changes.
Profile Discoverability
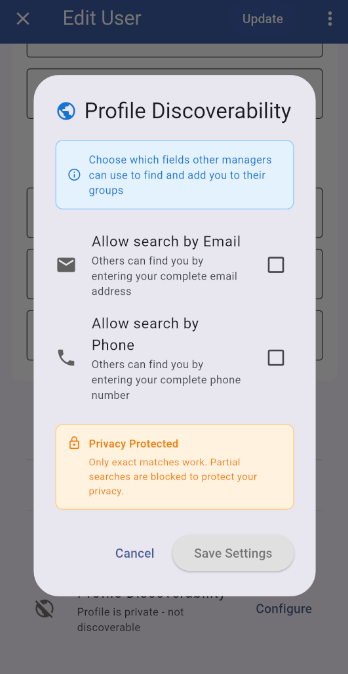
Profile Discoverability controls whether other managers can find you and add you to their groups using your Email and/or Phone.
Step 1 — Find “Profile Discoverability”
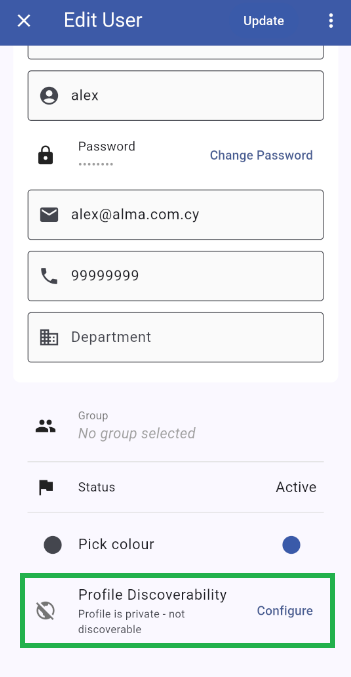
Scroll down on the Edit User screen until you see Profile Discoverability, then tap Configure.
Step 2 — Choose what others can search by
You can enable:
- Allow search by Email
- Allow search by Phone
None is required — you can choose email, phone, both, or neither depending on your privacy preference.
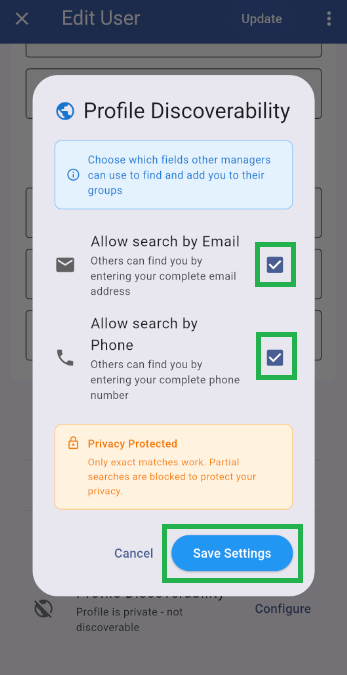
Step 3 — Save settings, then Update the profile
- Tap Save Settings in the dialog.
- Back on the Edit User screen, tap Update to apply your changes.
Create a Group & Add Members
Groups help you organize people and manage access cleanly. This guide shows: how to open Groups, create a new group, and add a member with the correct role.
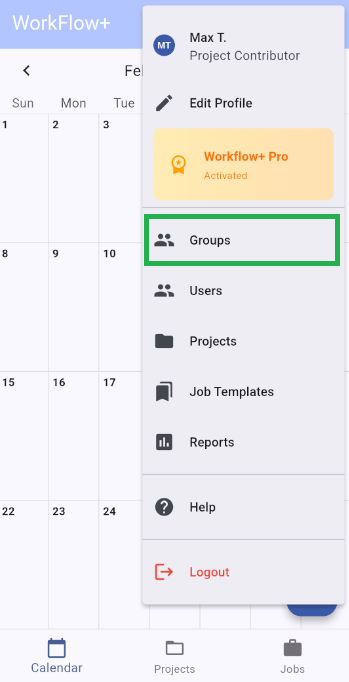
1) Open Groups from the top-right menu
Tap the top-right menu and choose Groups.
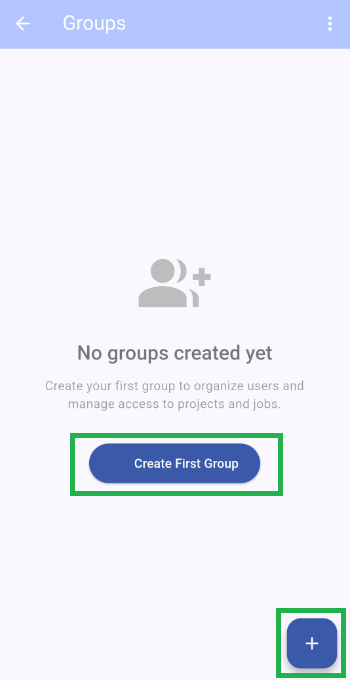
2) Create a new group
On the Groups screen, tap Create First Group (or use the + button).
3) Fill in the group details
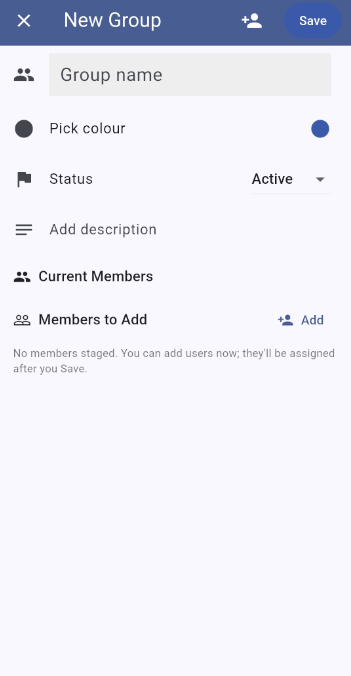
You’ll see the New Group screen. Start by entering a group name (and optionally pick color, status, and description).
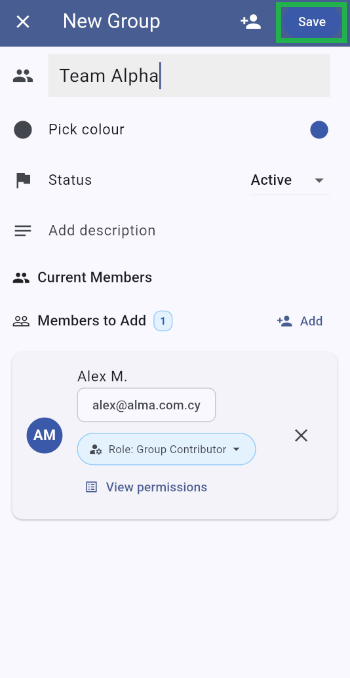
When ready, your group looks like this — filled and ready to save.
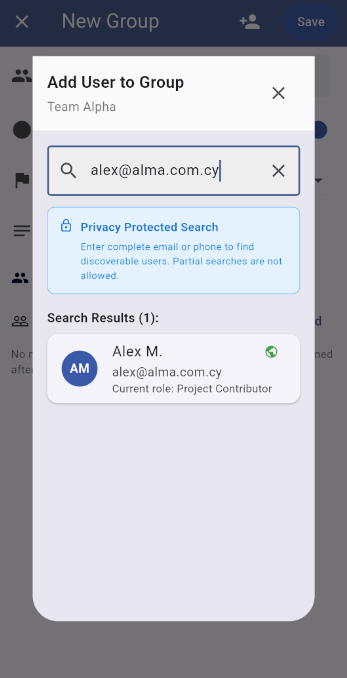
4) Add a member by searching Email or Phone
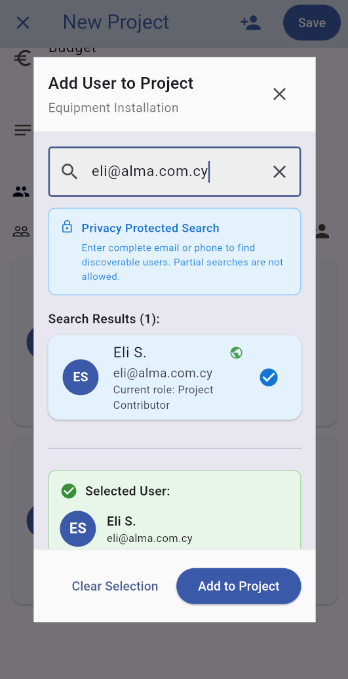
Tap Add under members, then search using the member’s full email or full phone number.
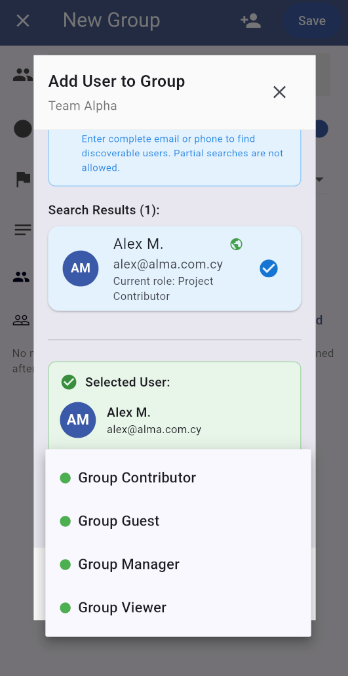
5) Pick a role for the new member
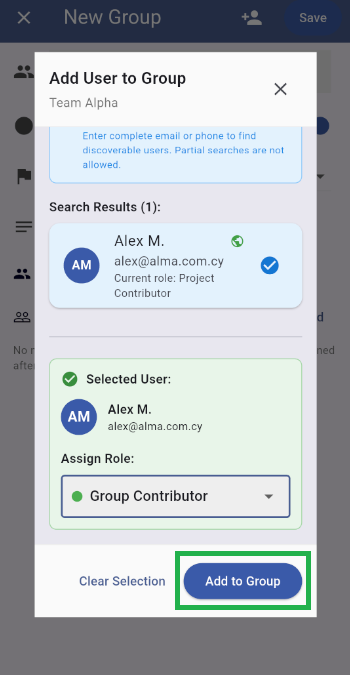
After selecting the user, assign the correct role. Choose what matches their responsibility in the group.
6) Add the member to the group
Once the user is selected and the role is set, tap Add to Group.
7) Save the group
Finally, tap Save to create the group and store your changes.
Troubleshooting: “I can’t find the user”
- Confirm Profile Discoverability is enabled for that user (Email and/or Phone).
- Use the complete email or complete phone number — partial searches won’t work.
- Double-check for typos (especially email domain, country code, spaces).
- If Pro features affect access in your setup, confirm your account has the required permissions.
Create a Project & Add Members
Projects help you organize work, dates, people, and permissions in one place. This guide shows: how to open Projects, create a new project, fill in the project details, add members from a group, add members by user search, and edit roles later.
1) Open Projects
Tap the Projects tab from the bottom navigation.
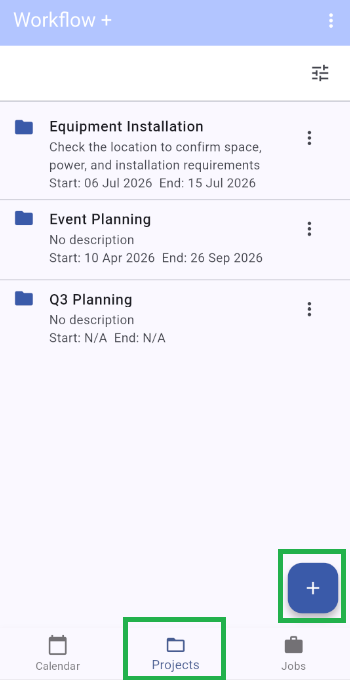
2) Create a new project
On the Projects screen, tap the + button to start creating a new project.
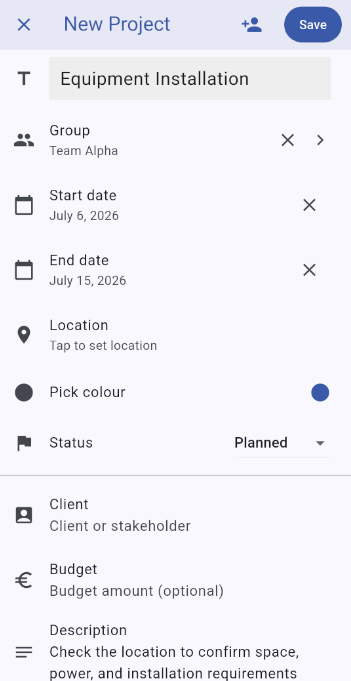
3) Fill in the project details
You’ll see the New Project screen. Enter the project details such as title, group, start date, end date, location, colour, status, client, budget, and description.
4) Add members from a group
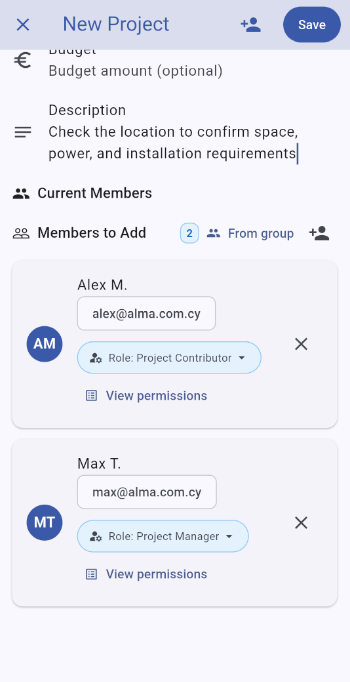
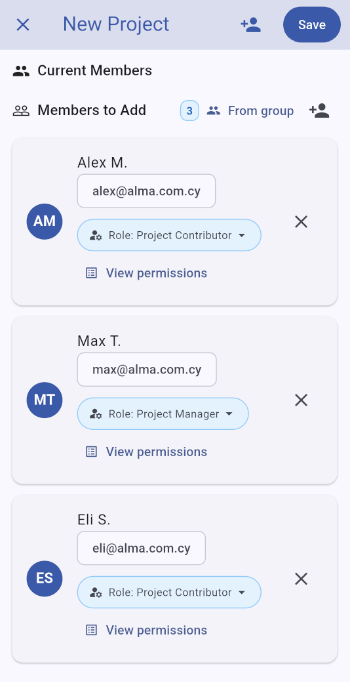
If you already have a group, you can quickly bring members into the project. Under Members to Add, tap From group.
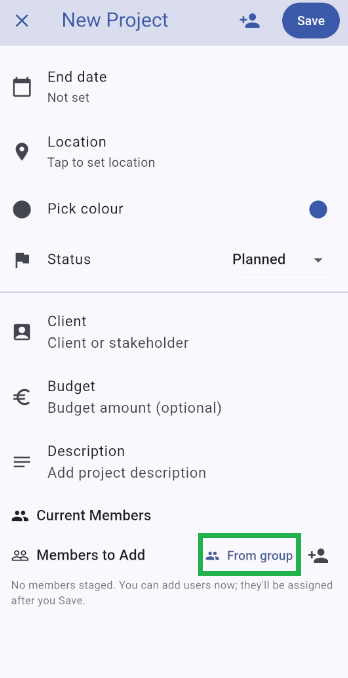
Then choose the members you want to add from that group.
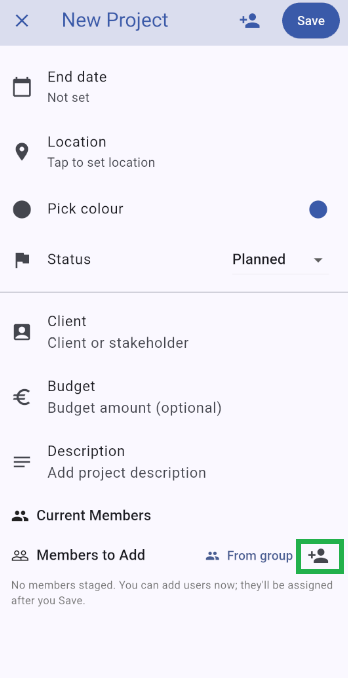
5) Add a member directly by search
You can also add a person manually. Under Members to Add, tap the add user button.
Search using the user’s full email or full phone number.
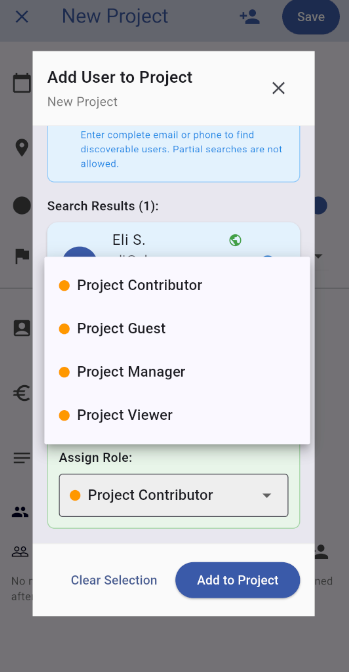
6) Select the user and assign a project role
After finding the user, select them and choose the correct role before adding them to the project.
7) Review current members
As members are added, they appear in the Current Members section with their assigned project roles. Check that the right people and roles are listed before saving.
8) Save the project
When everything is ready, tap Save in the top-right corner.
9) Edit member roles later
Even after the project is created, you can still change a user’s role later from the project members area.
Troubleshooting: “I can’t find the user”
- Confirm Profile Discoverability is enabled for that user.
- Use the complete email or complete phone number — partial searches won’t work.
- Double-check for typos, country codes, spaces, or wrong email domains.
- If you need to add many people quickly, use From group instead.
Job Templates
Job Templates help you save common job setups so you can reuse them quickly. This guide shows: how to open Job Templates, create a new template, apply a template to a new job, and save a current job as a template.
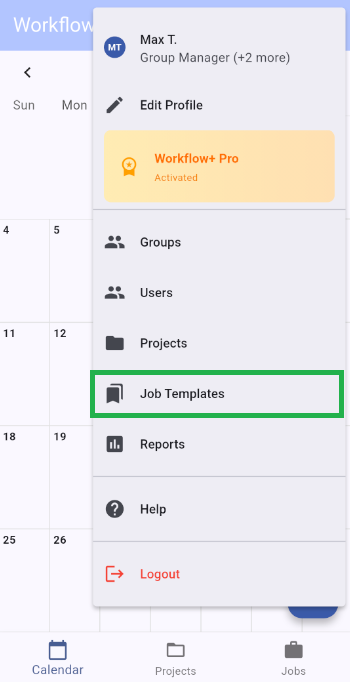
1) Open Job Templates from the top-right menu
Open the top-right menu and tap Job Templates.
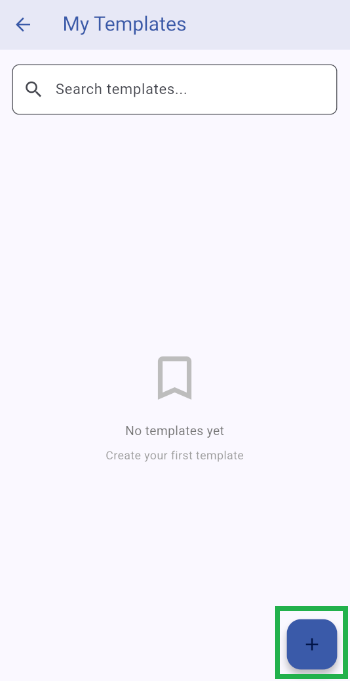
2) Create a new template
On the My Templates screen, tap the + button to create a new template.
3) Fill in the template details
On the New Template screen, enter the details you want the template to reuse later, such as the title, description, default project, location, colour, and whether it should be shared with a group.
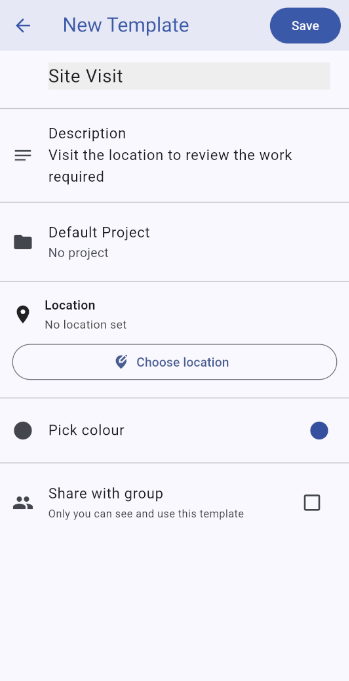
4) Save the template
When the template details are ready, tap Save in the top-right corner. After saving, the template should appear in your My Templates list.
5) Open the template options from a new job
When creating a new job, tap the template icon next to the job title field.
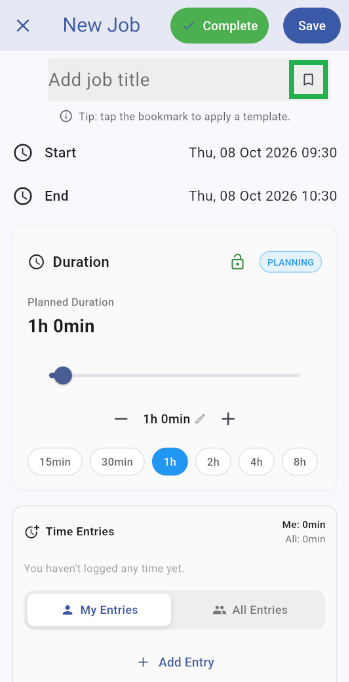
A menu will appear with two options: Choose from templates to apply an existing template, or Save as Template to create a new reusable template from the current job.
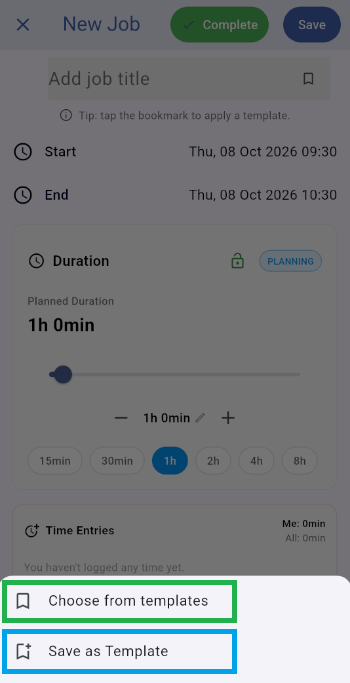
6) Choose and apply an existing template
Tap Choose from templates, find the template you want, and tap Select.
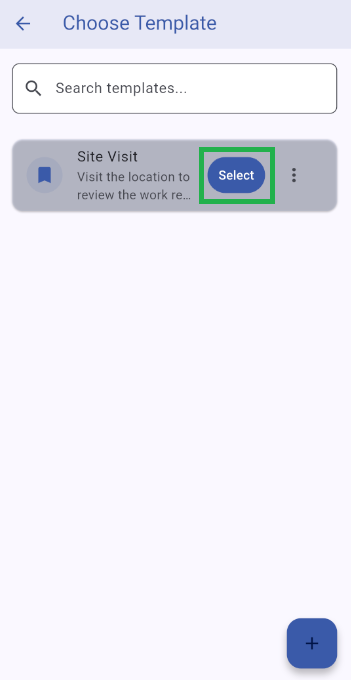
7) Template applied
Once selected, the template is applied to the current job and the job fields are filled automatically. You should also see a confirmation message.
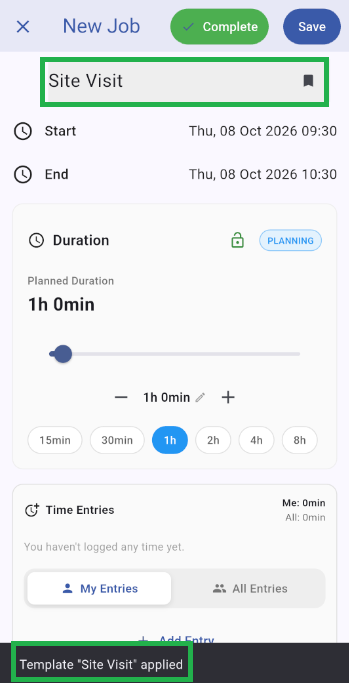
8) Save the current job as a template
If you already filled out a job and want to reuse the same setup later, tap the template icon and choose Save as Template. This creates a reusable template based on the current job details.
Troubleshooting
- No templates yet: Open Job Templates and create your first one using the + button.
- Template not applying: Make sure you tapped Select on the correct template.
- Wrong values after applying: You can still edit the job fields before saving the job.
- Need a reusable setup from a current job: Use Save as Template from the template menu.
Create a Job
Jobs help you plan and track work with dates, users, location, and project details. This guide shows: how to open Jobs, create a new job, fill in the main job details, assign users, choose a location, and use filters in the Jobs list.
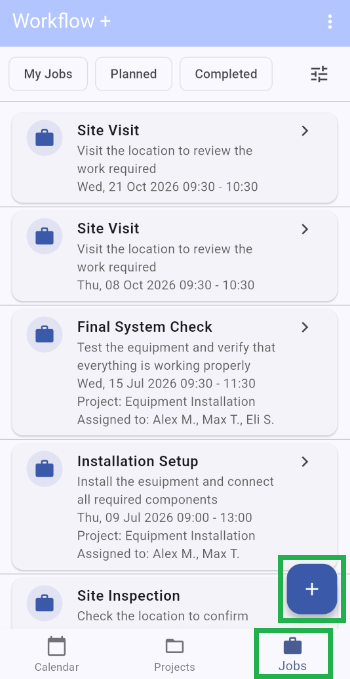
1) Open Jobs and create a new job
Go to the Jobs tab from the bottom navigation, then tap the + button.
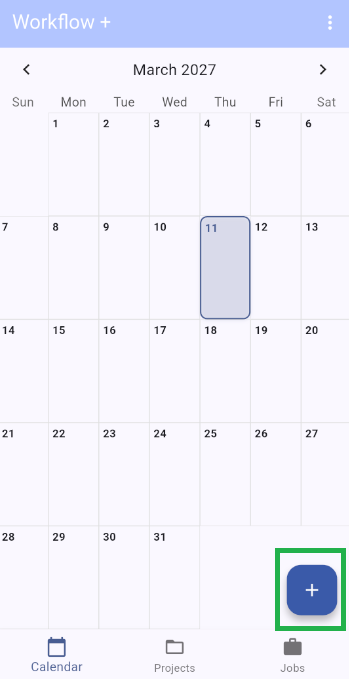
2) You can also create a job from the Calendar
If you are on the Calendar screen, you can also tap the + button there to start a new job.
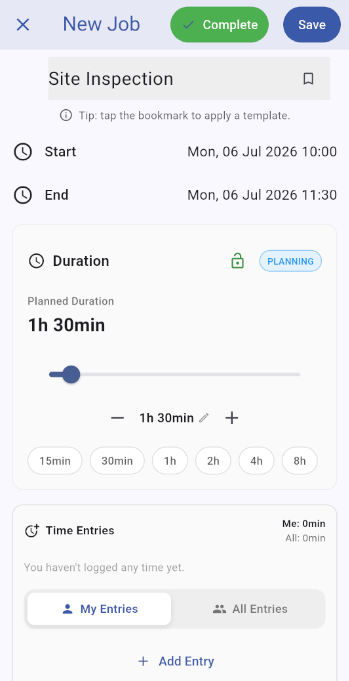
3) Fill in the first job details
On the New Job screen, enter the main details such as the job title, start time, end time, and duration. You will also see that the job begins in Planning status.
4) Select a project and assign users
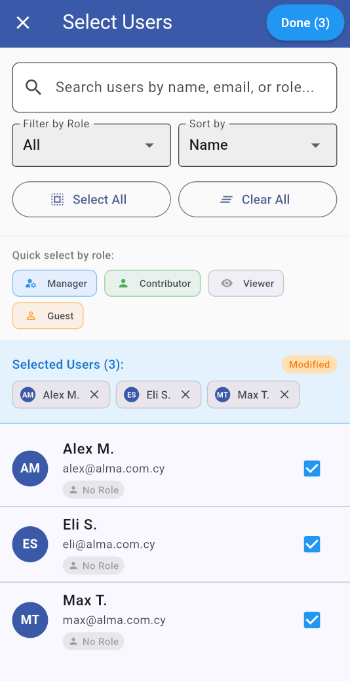
On the next part of the job form, choose the related project if needed, then tap Select Users to assign people to the job.
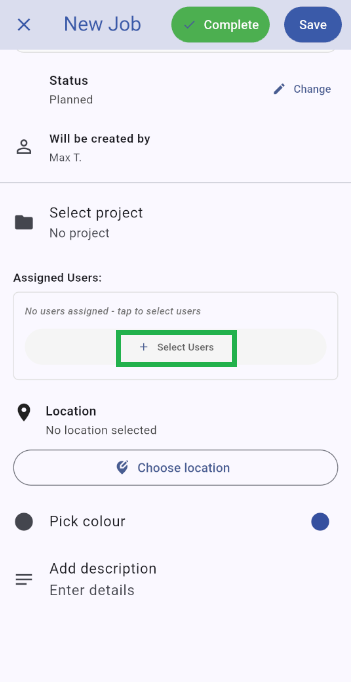
The available users shown for selection depend on the group you belong to and the project you selected.
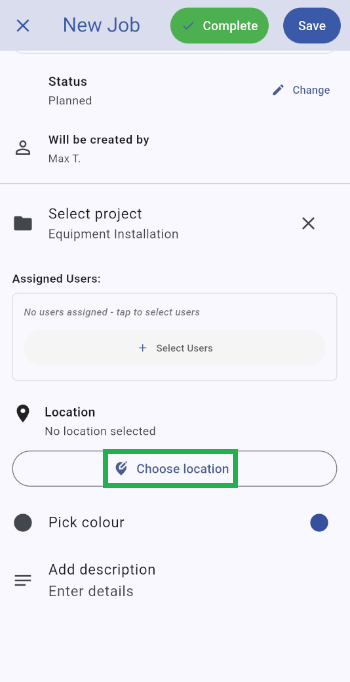
5) Choose a location for the job
Tap Choose location to set where the job will take place.
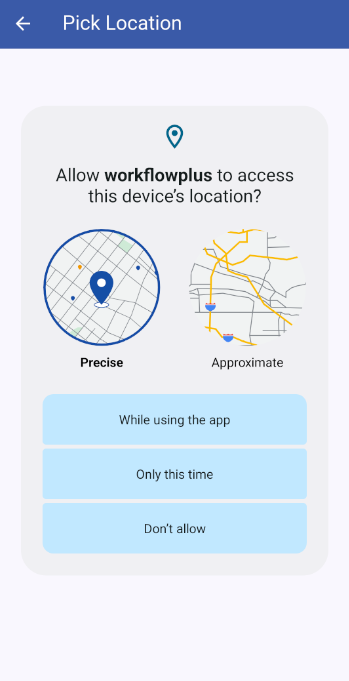
If location access is requested, tap Allow so the app can help you pick the job location.
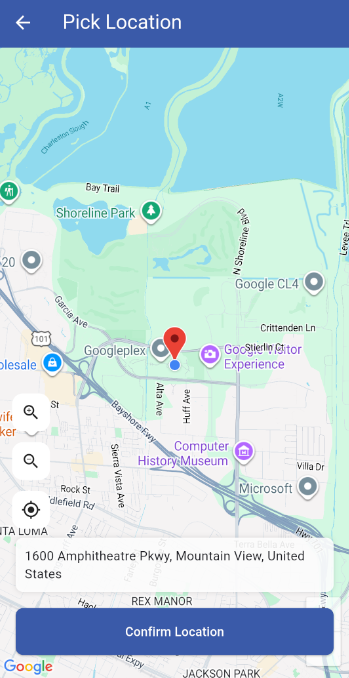
Then use the map screen to pick and confirm the correct location.
6) Add the remaining job details and save
Complete any remaining fields such as colour and description, then tap Save in the top-right corner.
7) Use filters in the Jobs list
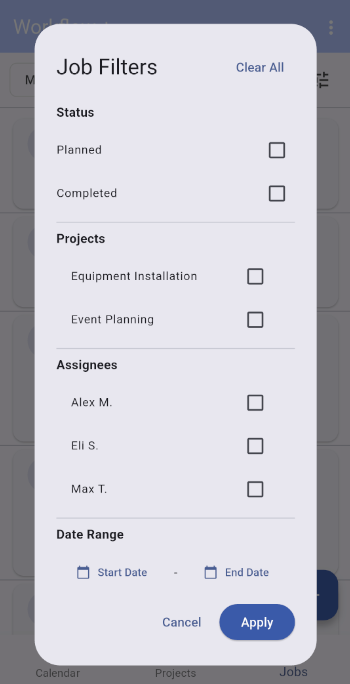
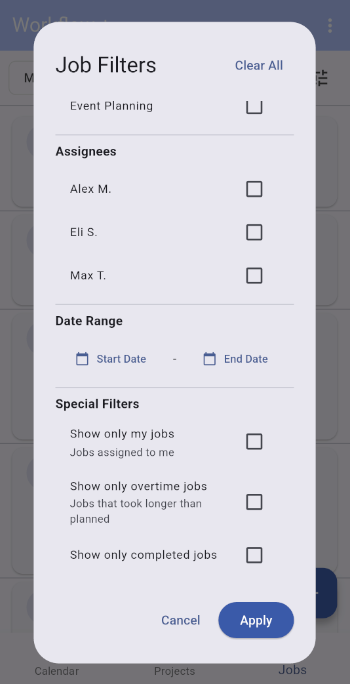
On the Jobs screen, tap the filter button to narrow the list of jobs. You can filter by items such as status, projects, assignees, date range, and special options like my jobs, overtime jobs, or completed jobs.
Troubleshooting
- Cannot find a user to assign: Check the selected project and your available group context.
- Location not working: Make sure location permission was allowed for the app.
- Job not visible after saving: Check the Jobs filters and the selected date range.
- Wrong details entered: You can reopen the job later and edit it if your permissions allow it.
Add Job Time Entries
Time entries let you record the hours worked on a job, including the date, start time, end time, and optional notes. This guide shows: how to open a job, open the Time Entries section, add a new entry, fill in the details, and save it successfully.
1) Open the job you want to update
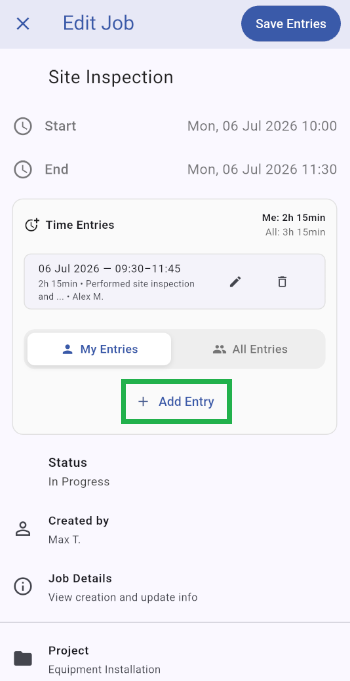
Go to the Jobs screen and open the job where you want to add worked time. In this example, the job is Site Inspection.
2) Open the Time Entries section
Inside the job details screen, find the Time Entries card. Then tap the Add Entry button.
3) Start a new time entry
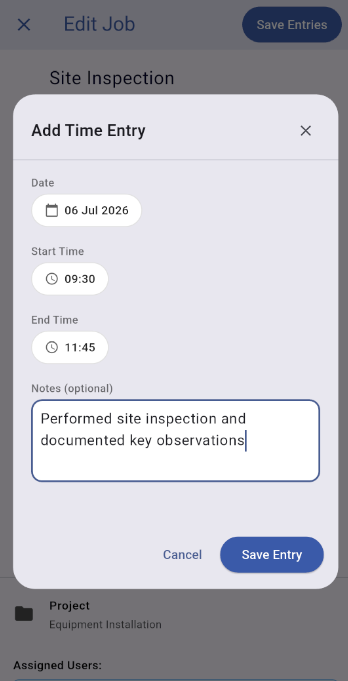
After tapping Add Entry, the Add Time Entry form opens. This is where you enter the worked time for the selected job.
4) Fill in the entry details
Choose the date, then enter the start time and end time. You can also add optional notes to describe the work completed.
In this example, the entry uses: 06 Jul 2026, 09:30 to 11:45, with notes for the site inspection.
5) Save the entry
When all details are correct, tap Save Entry. The time entry will be added to the job.
6) Review the saved time entry
After saving, the new entry appears in the Time Entries list on the job screen. You can review the saved hours, notes, and total recorded time there.
In the example shown, the saved entry appears under the list with its recorded duration and note summary.
Troubleshooting
- Add Entry button not visible: Make sure you opened the correct job and scroll to the Time Entries section.
- Cannot save the entry: Check that the date, start time, and end time are filled in.
- Wrong hours entered: Reopen the entry later and edit it if your permissions allow it.
- Entry not showing in the list: Check whether you are viewing My Entries or All Entries.
Generate Reports
Reports help you review jobs and time records based on the filters you select. This guide shows: how to open Reports, apply filters, generate a report, review the results, and export or share the data in useful formats such as CSV.
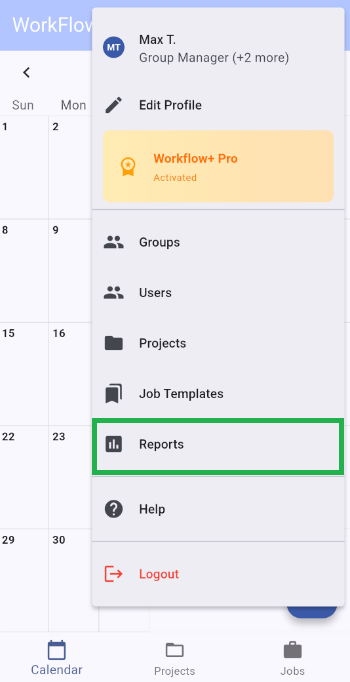
1) Open Reports from the top menu
Open the side menu from the top bar, then tap Reports.
2) Choose the filters for the report
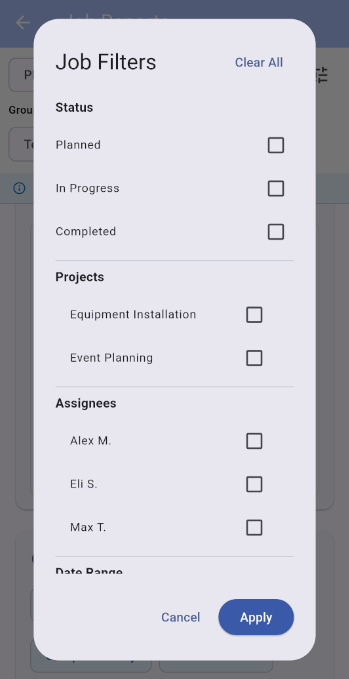
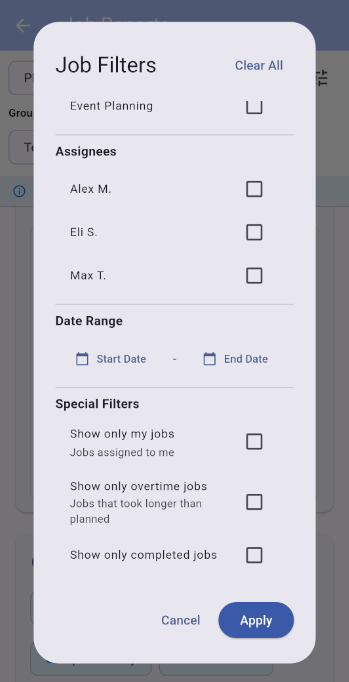
On the Job Reports screen, choose the job status tabs such as Planned, In Progress, or Completed. You can also narrow the results using the filter button.
The filter panel lets you select items such as Status, Projects, Assignees, Date Range, and special filters like Show only my jobs, Show only overtime jobs, or Show only completed jobs.
3) Generate the report
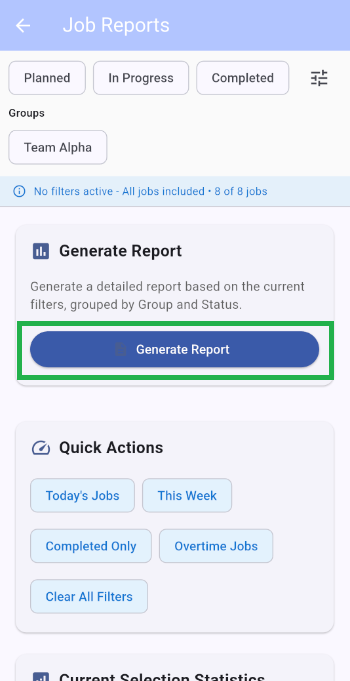
After choosing your filters, tap the Generate Report button. The report will be created using the current selection.
4) Review the report output
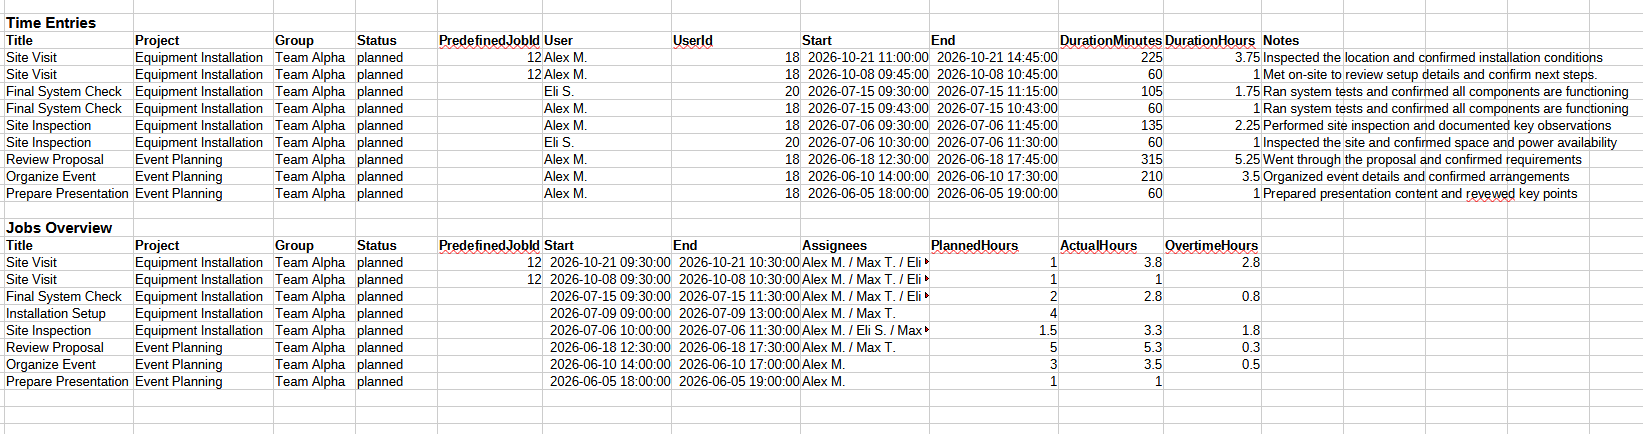
After generation, the report output can include sections such as Time Entries and Jobs Overview, depending on the selected data. This gives you a structured view of recorded work, durations, users, projects, and notes.
5) Export or share the data
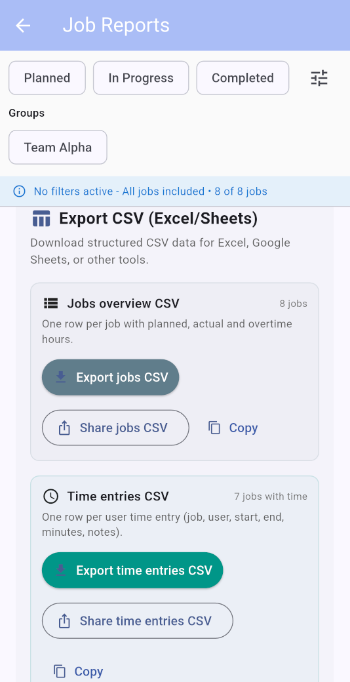
You can export or share the generated report using the available actions. For example, you may see options to Export jobs CSV, Export time entries CSV, Share, or Copy.
Troubleshooting
- No useful results in the report: Check the selected filters, status tabs, and date range.
- Missing jobs: Make sure the correct group, assignee, and job status filters are selected.
- Overtime results not showing: Enable the special overtime filter if needed.
- Export not matching expectations: Review whether you need a jobs overview export or a time entries export.